|
Here is a very interesting News article, titled, "Metal vs. Shingles: Florida’s asphalt roofs under scrutiny as insurers push for change" that will affect EVERY homeowner in Florida.
www.yahoo.com/news/metal-vs-shingles-florida-asphalt-224955496.html I have been predicting this change for several years. The current home insurance model is unsustainable. Insurance companies are bleeding money due to roof claims. That is what is driving the recent spike in home insurance costs. My personal home soared to $9k a year and then we were dropped. I got quotes as high as $12k before I was able to find a more affordable alternative of "Only" $6.5k! And I HAVE a metal roof! This explanation may get a little long, but this is what is going on. First off the Florida building code states that if 50% of the roof system needs to be replaced, then the entire roof must be replaced. (That used to be 25%. But the insurance industry got that changed as of July 1, 2022.) But still, roofers, especially some of the less scrupulous ones, can easily find damage on enough older shingles to meet that 50% rule. Due to the interlocking nature of shingles, when a shingle is replaced, many times they have to replace a large portion around it. Secondly, the Insurance industry covers roofing as a "replacement" item. Even if the roof has been on the home for 15 years, they have to replace the entire roof. A "30 year shingle" here in Central Florida is really a 15-18 year product. The year round sunshine is reason we love to live here but is also the reason that they do not last. As they age, shingles become brittle and start to lose their granular content. Go look in your rain gutter sometime and check out the sandbar of granules in there... and that is just from regular wear... When storms happen, an older shingle is much more easily damaged by flying debris or hail. They also start to lose their adhesion. So when wind get under them, they fold back and break. So starting around the 10 year mark, shingles here in Central Florida have become susceptible to damage in a typical summer afternoon storm. Much more so in an "Named" storm. So, what is the fix? Well, I am not an expert on how the insurance industry works from the inside, but it seems to me that there are a few options. Option 1: Change the industry to adopt an Actual Cash Value (ACV) type system vs. a replacement system. Basically that is a "pro-rated" system. Like a road hazard warranty on your tires, you get some credit for your roof's life that is left when you make a claim. But if you have had your roof installed for a number of years, you don't get a "free" new roof. There are many challenges to this system, but I see this as a change that is on the horizon. Option 2: The insurance industry stops writing coverage for a shingle roof. That is what the subject article is suggesting. This has happened before with other "defective" home products. For instance, getting insurance for a home with Polybutylene piping or a Federal Pacific Electric (FPE) panel or single strand aluminum branch wiring is difficult to the point of being almost impossible. Fortunately, those are fairly inexpensive to swap out or remediate. Replacing a roof is a much more costly affair. Metal roofs have their own drawbacks. Some HOAs will not allow them because they do not meet the "aesthetic" of the neighborhood. If a sweeping change to the insurance industry happens, then the HOAs would be forced to change. Metal roofs are much more expensive than shingles. So when a roof claim does happen on a metal roof, it is a much larger hit on the insurance company. So I assure you that the prices will not be coming down much just because you have a metal roof. That may ease the burden on the insurance industry a bit, which would open the door to more companies ... which would create better competition... supply and demand and all that.. but let's not go down that rabbit hole... Metal roofs are.... metal. So you are living in an large metal bowl. Cell service is directly impacted. If you are in an area with low cell service already, you would have to get a booster etc. for your home. They are not super expensive, but it is an additional cost. So, in the end, don't expect any relief from high costs of home insurance any time soon. Sincerely, Bo Passen, Passen Inspections LLC Florida Association of Building Inspectors, Master Professional Inspector By the way... as a little side note... the shingles in the picture headlining the article are being installed incorrectly... #doyoureallyknowwhatyouarebuying #passeninspections
0 Comments
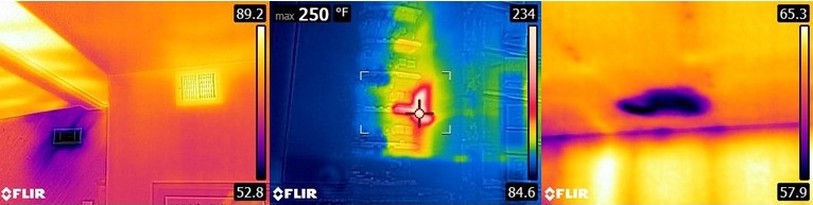
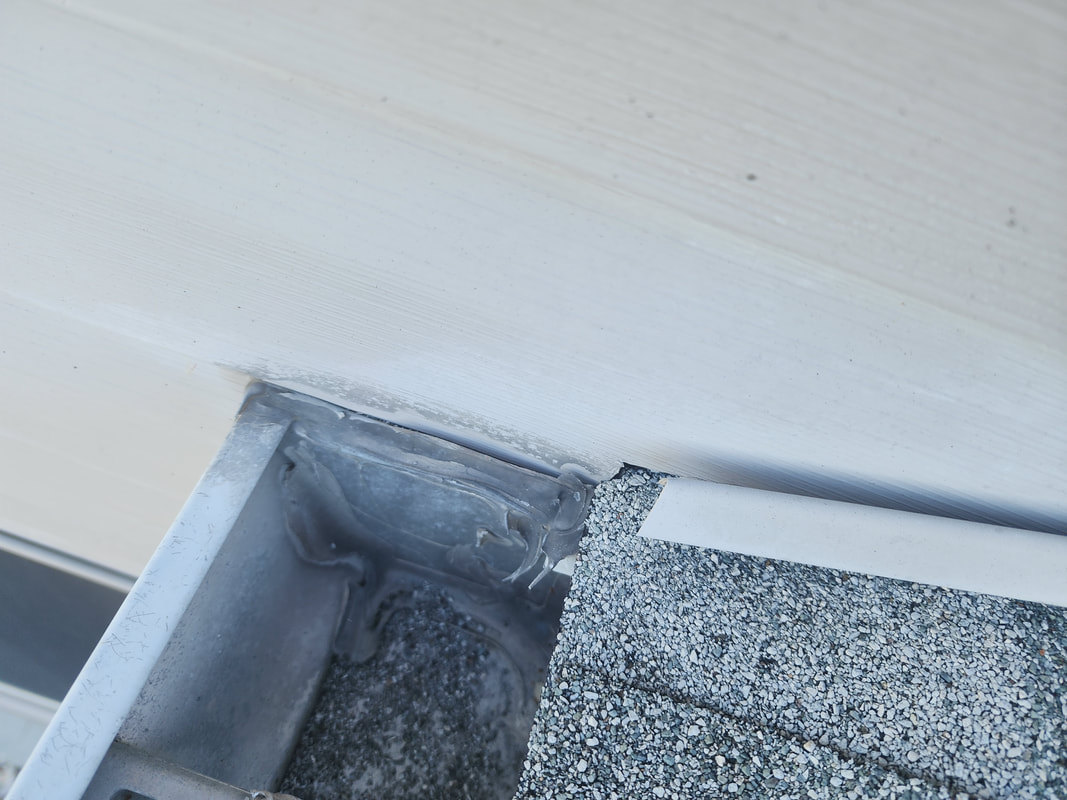
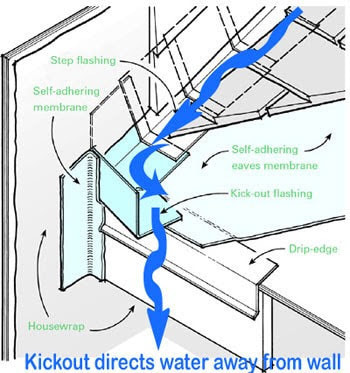
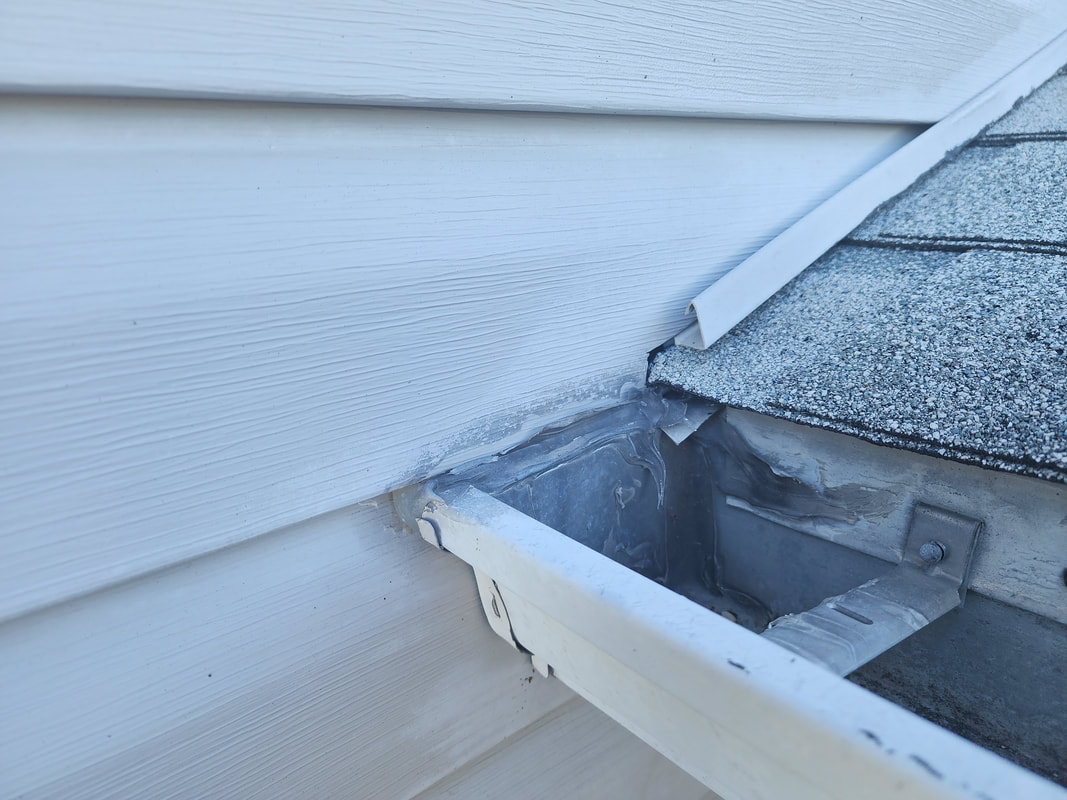
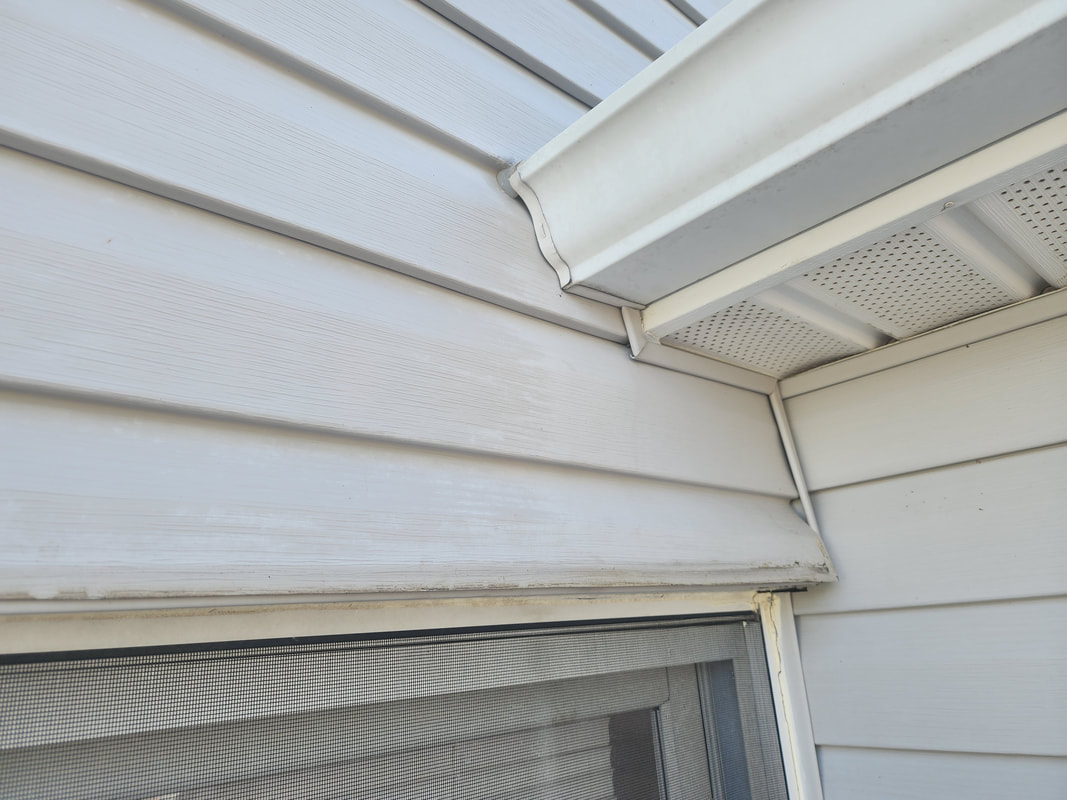
I did a blog entry on Kickout Flashing a while back that I titled CSI. Scroll down to see it. Well, here is my next chapter on Kickout... or the lack thereof... This home is a 1000sqft bungalow, late 90s build in the Villages. Frame with vinyl siding. The vinyl has been improperly installed, with no water resistive membrane. That is a huge issue, in itself. But even with the correct membrane installed, the lack of kickout would have resulted in water intrusion. The membrane (commonly called House Wrap or Tyvek) is not designed to shed bulk water. So the flashing is essential. Now, some builders will tell you that Kickout is not required... well they are right... The code only states that it must be a water tight seal. We have learned over time that the best way to do that is with kickout flashing. Flashing is a permanent thing, whereas caulking and sealing will fail over time. It has never EVER been code to funnel water behind a wall... Here is a little video that I made while at the property. I update FB much more often than my webpage, as I can do it on the fly...
I spoke with a General Contractor and sent him the video and pictures. His rough estimate is that a proper repair, to include the removal of the vinyl, installation of house wrap, and repair all the rotten wood (that we know will be at the windows and doors etc), install all the correct flashings, and then replace the vinyl... will be north of $30,000... may be as high as $50,000, depending on the amount of damage they find when they peel things apart... Yikes! #doyoureallyknowwhatyouarebuying Stucco as an exterior cladding has been used for centuries. It is a fantastic exterior cladding when it is done correctly... but when it is not... So, what is stucco? Basically it is concrete. I could get a bit more in-depth, but that is what it boils down to. Today, we don't use a true 3step Stucco finish. What we use these days is called a "cementitious finish".... but everyone still calls it stucco. And, just like anything else, it has to be installed correctly and properly maintained. Over masonry, it has to be at least 3/8" think. Over frame it has to be at lest 7/8"! Maintenance wise, it has to be painted regularly and any joints etc sealed. Remember that your exterior paint is your raincoat. Let's take a look at this 2007 Central Florida home. Besides being bigger than most (almost 4k sqft) it is very typical. The first floor is masonry and the top floor is frame. 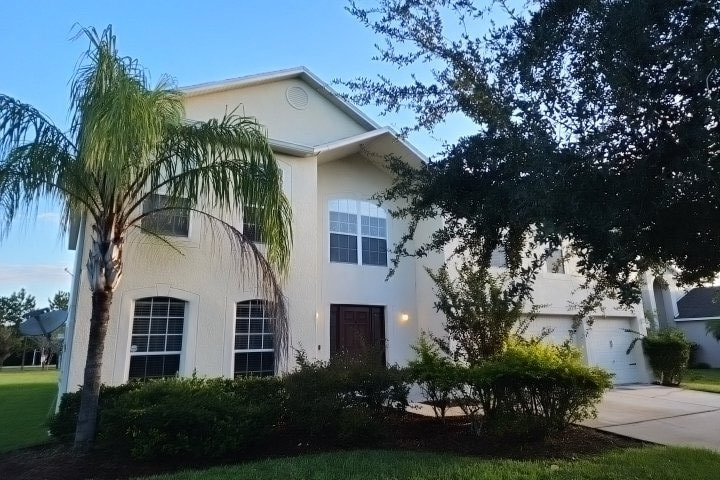 We will start on the lower floor and we will find that the paint is chalky and faded with multiple stucco cracks. We are gonna focus on these three because they show the issue the best. On the right side of the home, there are three cracks that are six or eight feet apart. But, the important part is that they are in the garage area. The garage does not have drywall or other interior finish, so it really tells the story. Now we can look at the frame upper portion... Remember that the better you caulk, seal, and paint... the better your house will perform!
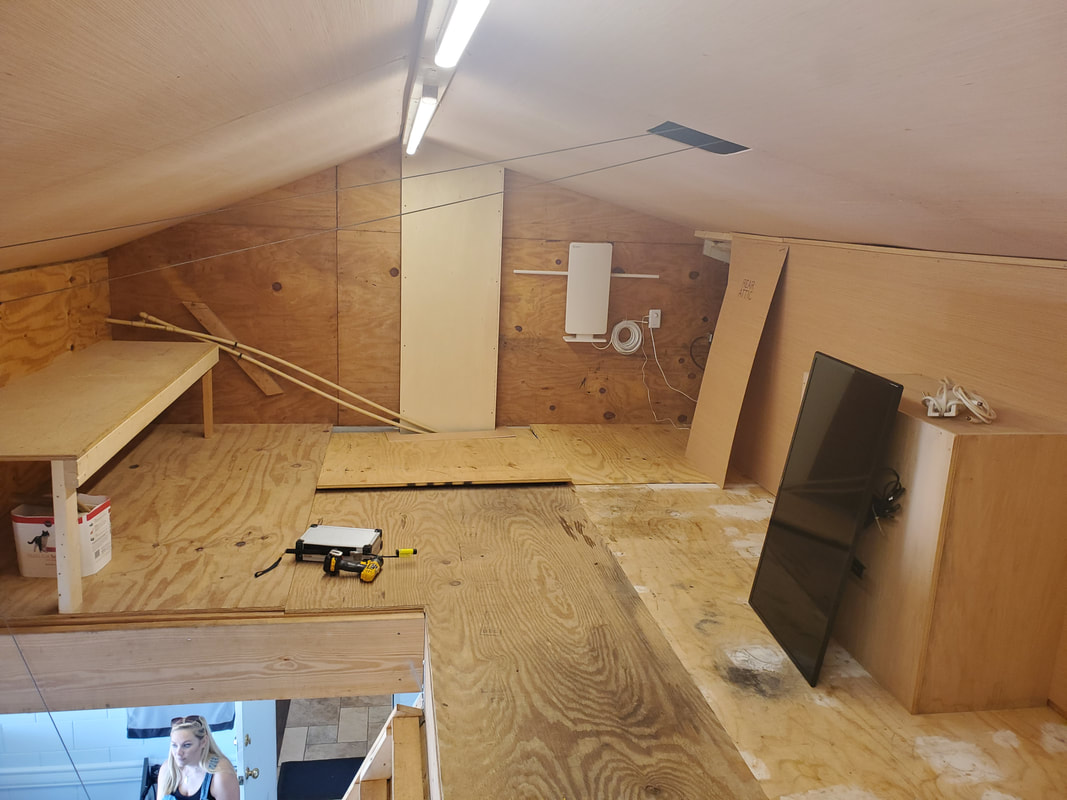
AND Interior paint and exterior paint... the only thing they have in common is the word Paint. Interior paint is lipstick, exterior paint is your raincoat! #doyoureallyknowwhatyouarebuying The homeowner felt that he needed some extra storage space... I can understand that. BUT... cutting out the trusses and compromising the structural integrity of your home is not the best way to accomplish that. When I looked at the configuration of the building and the space, I had a feeling that it was not going to be a good thing. I had to remove a few floor panels to confirm. I am glad I did. The buyers would have been stuck with a major issue if I had not found this.
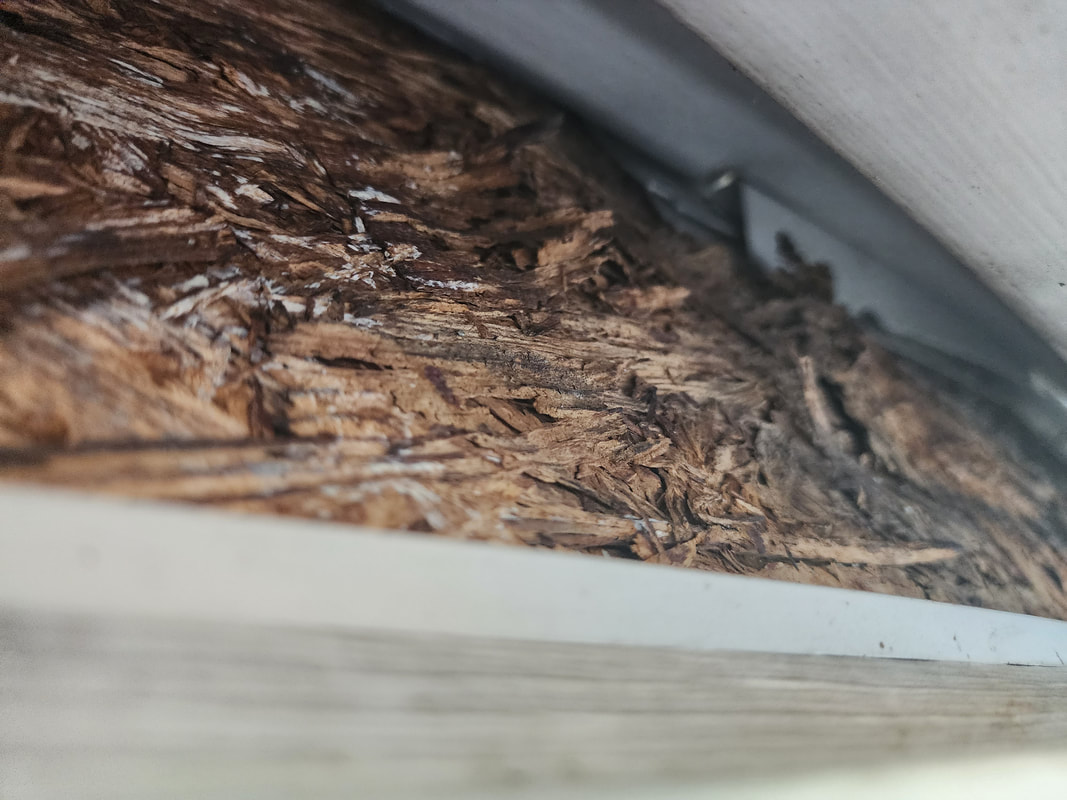
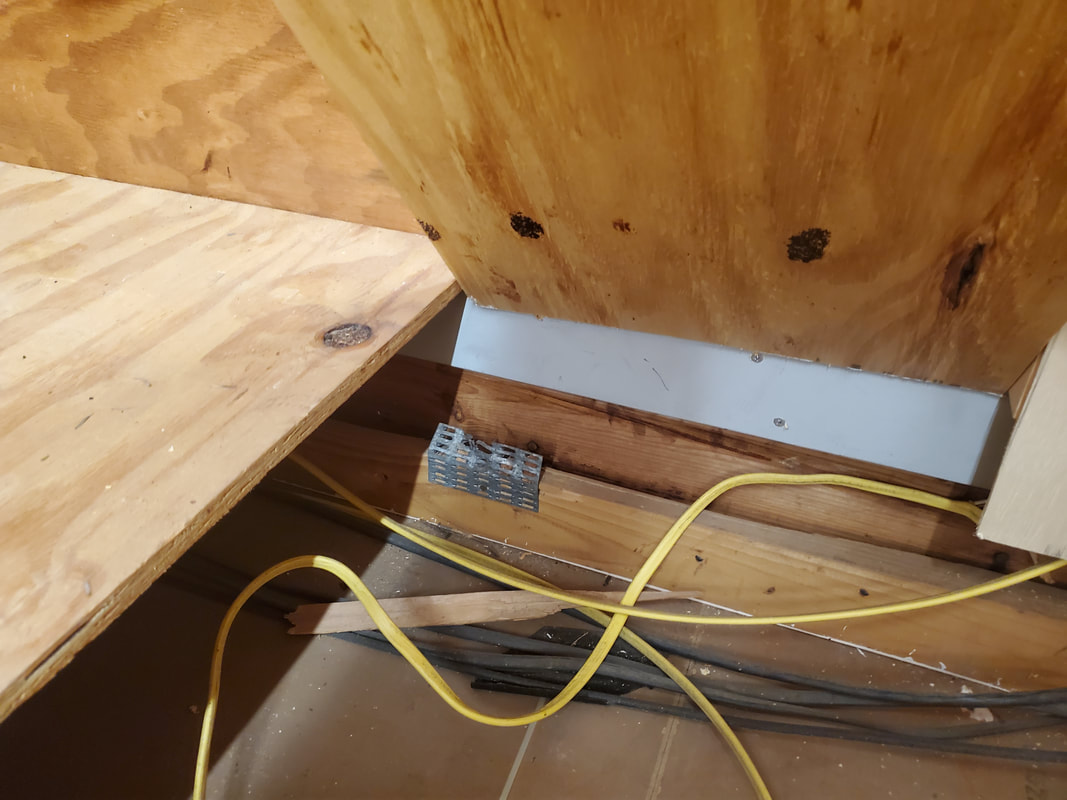
I often tell people that my profession is a lot like CSI... You find one clue... that takes you to another... that leads to something else... that finally ends up showing the real issue. Sometimes, it goes the other way... Like in this case. SO.... LET'S PLAY CSI ! I saw something that I KNOW is gonna be an issue, so I followed the clues. So, in the end, the repair attempts were exactly that.... attempts... The correct fix is to add the kickout flashing.
So, we know that water has been getting in the structure and down into the wall cavity. Because this is a wood frame home, it could have cause some pretty significant structural issues, but there is no way to tell without more destructive investigation. Thanks for playing CSI with me! Gonna rant a little here...
We completed an inspection on a 90 year old home that had been converted to apartments this past week. When we (3 inspectors, 2 senior experienced and one licensed just under a year) got there, the property manager stated that the building had been inspected a week prior. Said the inspector was there almost two hours. When I told her that this would be an all day inspection, she was quite angry. My buyer is an investor that we have done a lot of work with. She told me that she had a copy of the original inspection and it was inadequate. It was a whopping 4 PAGES for almost 6000 square feet of living space in two buildings! She sent it to me today.... I can tell that I am totally invested in my profession because I was openly angry as I read the "report". Things like this are why Inspectors have a bad reputation. Some of the nuggets....
Guys like this are an embarrassment to the profession. Wow! has the year flown by! I cannot believe that is it June already... As I said in my last post, I was asked to teach a portion of the training at the annual American Society of Home Inspectors, Inspection World '18 event. Here is the link to the full live broadcast. This was the actual broadcast to the classroom. These three videos cover the same home but were filmed separately. Part One , Two , and Three I am really looking forward to being able to work with the fine staff at ASHI again in the future.  We are please to announce that starting in 2018, I will be expanding the services of PITI to include training new inspectors. I have been asked to join the staff of The Home Inspection University, Florida! I am very excited to take my vast experience as an instructor into the exciting field of Home Inspections! Our first classes will begin in March 2018. I have also been asked to lead a training session at the American Society of Home Inspectors, Inspection World event in Jan 2018. IW is the premier, continuing education national training conference for Home Inspectors.   I get asked all the time "Why would I want an inspection on a brand new home?" Well, sadly, the answer is because in addition to the really good ones, there are some pretty lazy and/or shady contractors out there. In new construction, I have found entire homes that had no insulation... no insulation over certain portions of the home... cut trusses to make room for ductwork... improperly installed tile in showers and floors... leaking roofs, windows, and doors... this list is amazingly long. The good thing that I have found tho, is that the vast majority of the Superintendents are happy to have someone assist them in their Punch List. Another set of eyes is always a good thing on something that is as complex as a Home. Two days ago, I did an inspection on a new roof and it was not pretty...The roof had been signed off and finaled by the Municipal inspector about an HOUR before I arrived... The roof drip edge was terrible. It had gaps, bends, reversed laps, and mis-cut corners etc. etc. etc. When I went on the roof, I started looking deeper and the entire roof had an improper stagger at the seams... some as small as 3 1/2" ... This is about half of what it should be and is not following the manufacturer's installation instructions. This minimal stagger will be prone to leaks. Today, I got an e-mail from the Roofer and he stated that he was embarrassed that his foremen allowed that to happen and the roof is currently being torn off and they are starting over... Win one for the Good Guys! So, don't skip the inspection, even on New Construction! |
Bo PassenRobert W. "Bo" Passen Archives
January 2025
Categories |
News and Notes
Welcome to my Blog. This is the area where I post item that I find interesting or that I feel can help my clients.
Some are strange, some are informational, some are downright scary...
Comments and/questions are always encouraged.

 RSS Feed